Matlab App Designer 笔记
1、Matlab 使用 App Designer 的条件
Mathworks 在R2016a 中正式推出了GUIDE 的替代产品:AppDesigner,这是在MATLAB 图形系统转向使⽤⾯向对象系统之后(2014b),⼀个重要的后续产品,它旨在顺应Web 的潮流, 帮助⽤户利⽤新的图形系统⽅便的设计更加美观的GUI。要使⽤App Designer,需 要最新的MATLAB R2016a及以上的版本。
2、App Designer 和 GUIDE的对比
相比于GUIDE的显著的特点如下所示:
- 最明显的特点:⾃动⽣成的代码使⽤了⾯向对象的语法。
- 最⼤的优点是:增加了和⼯业应⽤相关的控件:⽐如仪表盘,旋钮,开关,指⽰灯。
- 采⽤现代且友好的界⾯,⽤户更容易⾃⼰学习和探索。
3、App Designer 的简易使用
3.1 在matlab中打开 App Designer
在matlab中打开App Designer有两种方法。
-
方法一
在matlab命令行中输入 appdesigner 回车后就可以打开App Designer设计器。
-
方法二
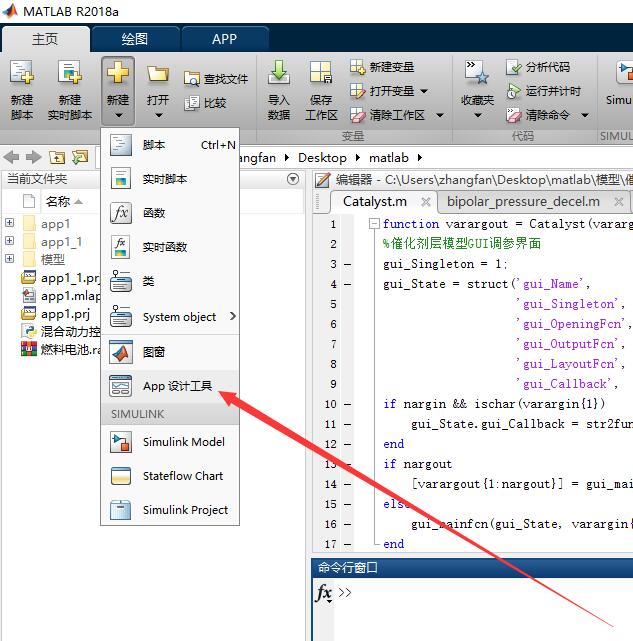
在matlab主页找到 主页>新建>App设计工具,然后点击打开,如下图所示:
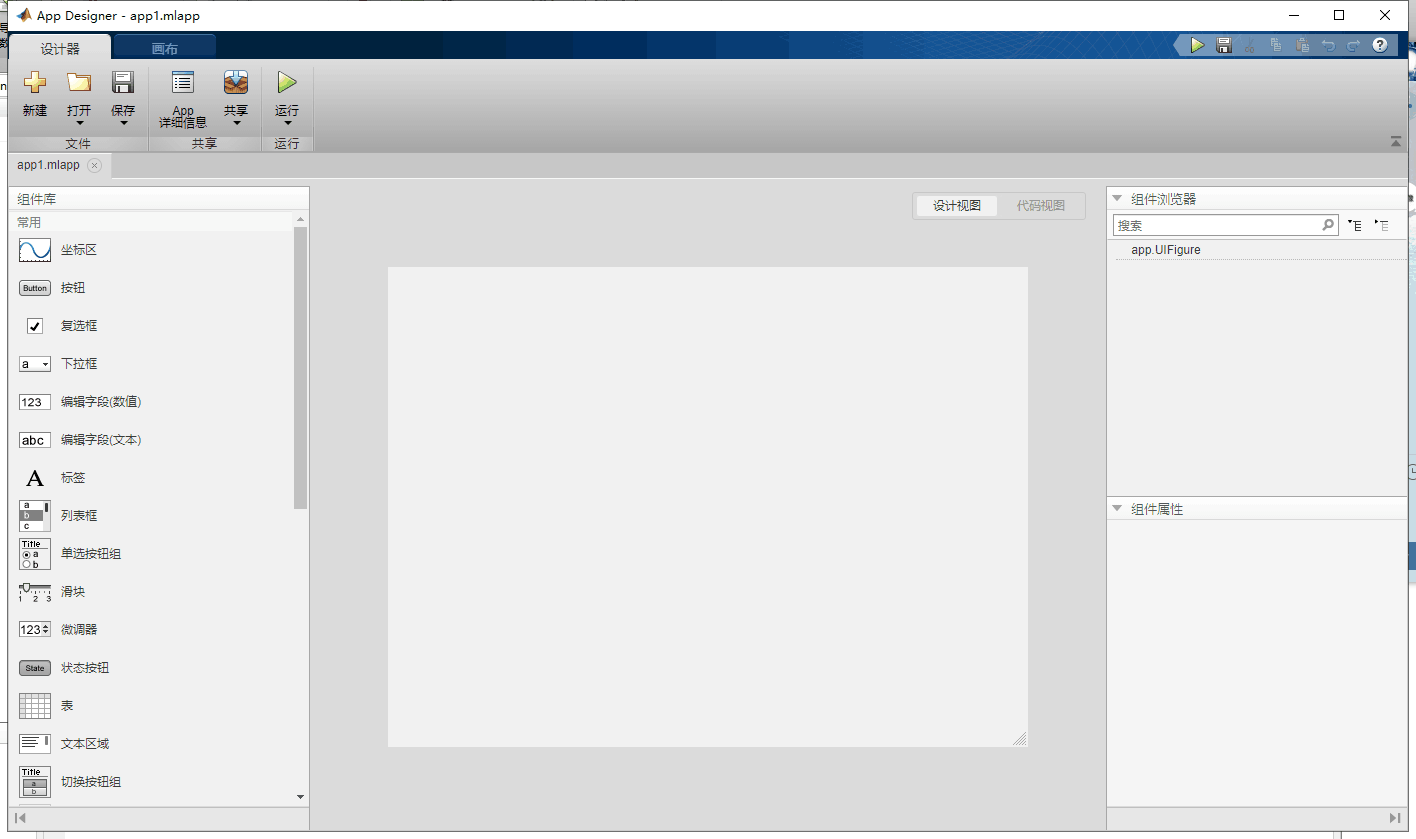
打开后的app designer设计界面如下图所示:
3.2 App Designer GUI 简单的布局
3.2.1 第一步,拖拽需要的控件到画布上
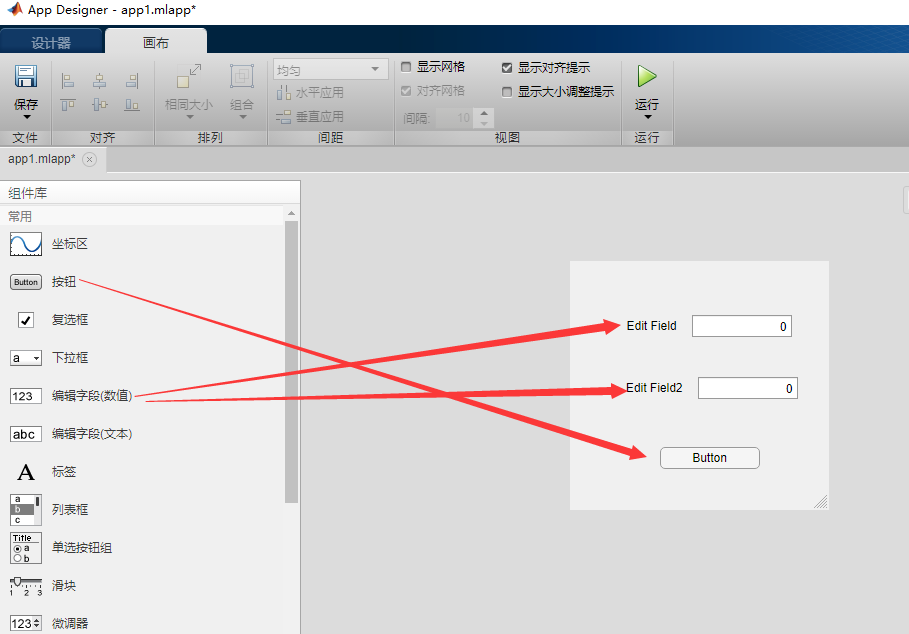
在App Designer的GUI设计中,通过拖拽相关的控件来完成GUI的简单布局,如下图所示,我们设计一个计算汇率转换的App,先将所需要的控件(用到了输入输出框、确定按钮这三个控件)拖拽带画布中(画布的大小可调)。
3.2.2 编辑和修改控件的相关参数
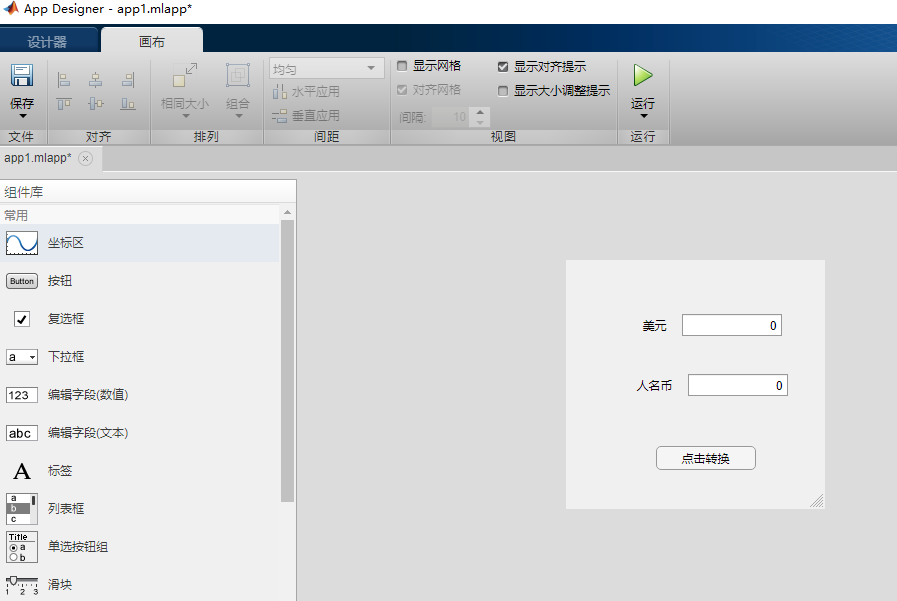
将上述画布中相应控件的名称更改成我们需要的名称,直接点击相关的字段即可完成编辑修改,修改后的界面如下图所示:
3.3 编辑部分控件的回调函数
如上图所示,我们设计好了汇率转换这个测试App的界面,但是点击相关控件并不会有任何反应,这是因为还没有确定各个控件之间的逻辑和控制关系,而这些需要通过编写回调函数来实现。 我们上面设计的App界面实质上是在设计视图上看到的样子,如下图所示:
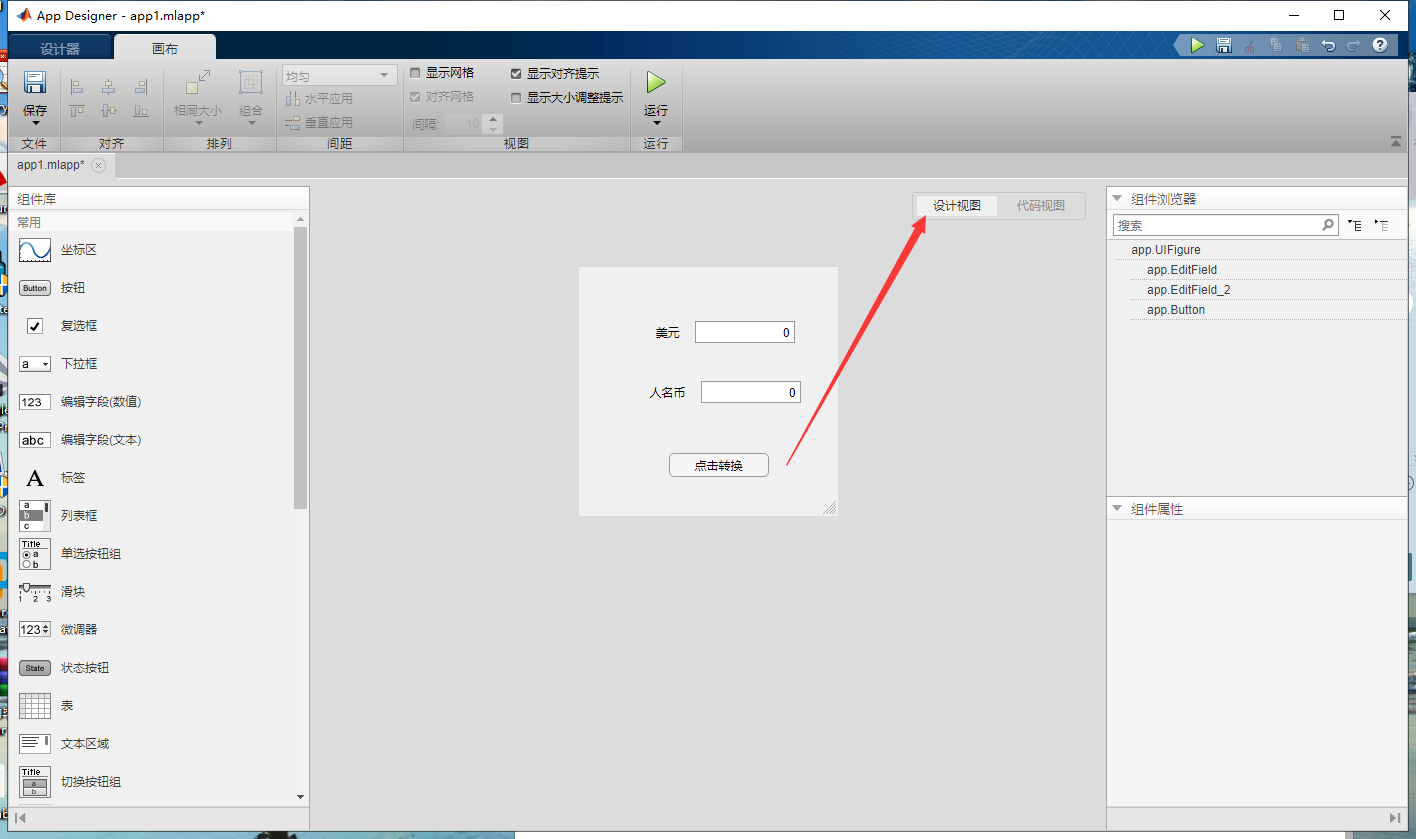
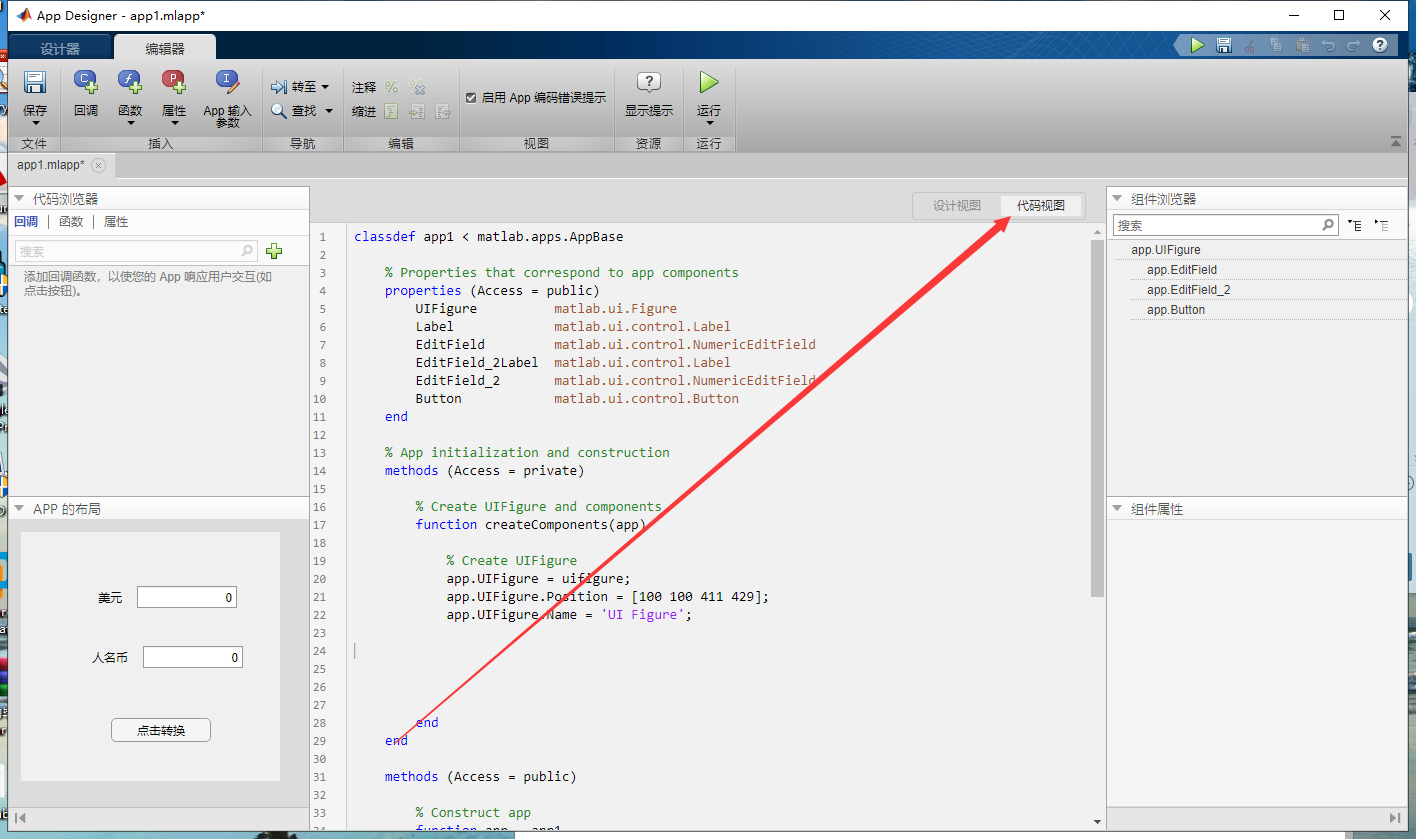
点击代码视图,即可看到该App的描述代码,如下图所示,而我们的回调函数也正是在代码视图下编辑。设计视图和代码视图实质上是同一个东西的不同表现形式。
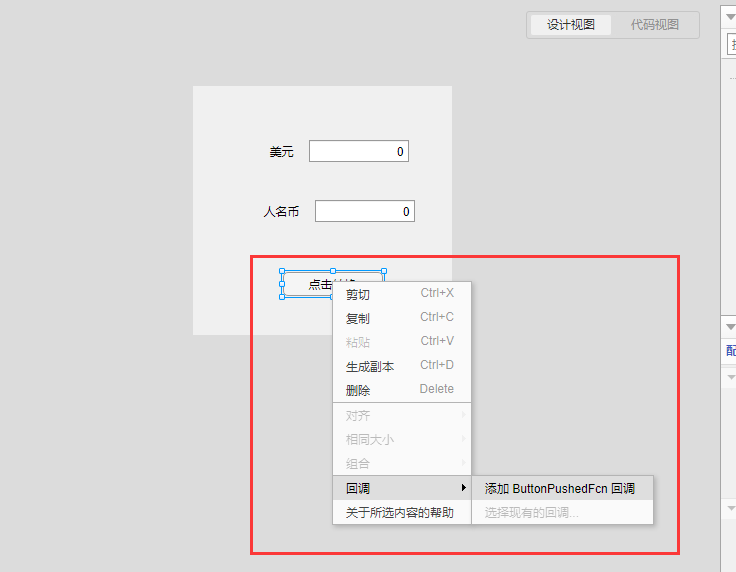
编辑 按钮 的回调函数
在设计视图下,右键单击按钮,找到回调 > 添加ButtonPushedFcn回调,会转到代码视图的回调函数功能编辑区,直接编辑回调函数就可以了
下面再3.4中讲如何实现汇率转换这个App的功能
3.4 汇率转换App功能的实现
上面我们以汇率转换为例讲了回调函数的相关问题,接着上面的例子来,上面已经布局好了app的界面,接下来首先设置一个汇率变量参数x,在代码视图模式导航栏的编辑器中找到 属性,点击添加私有属性(也就是只能在当前类中使用,类似于局部变量)。在代码中生成的空白的properties 中 添加如下代码:1
x double
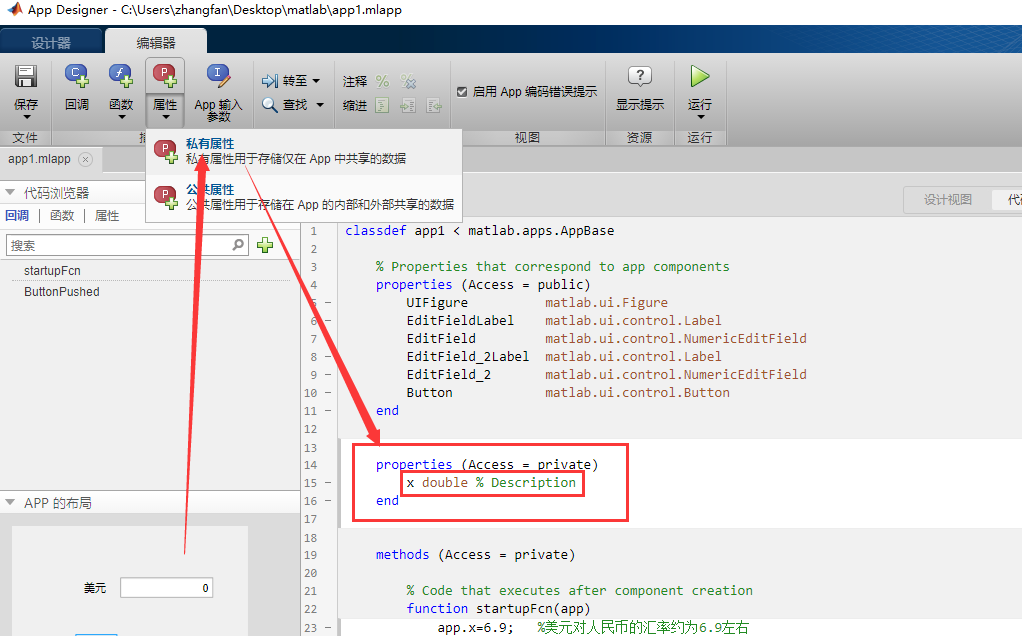
其中代码当中的x为声明的属性,double为属性的类型。
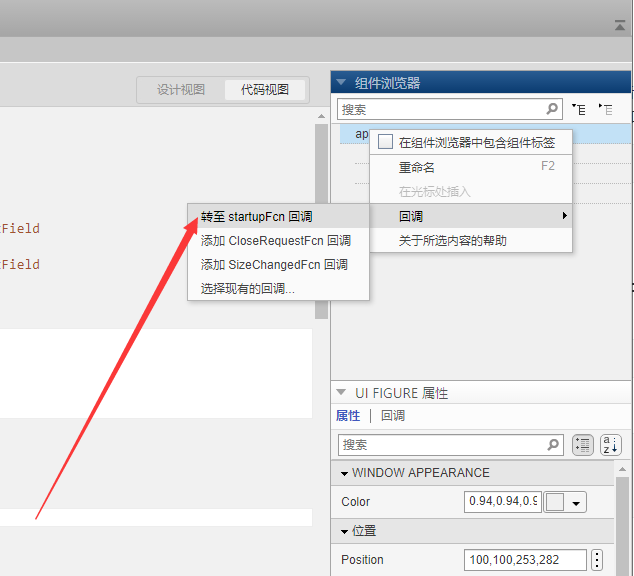
回到设计视图,右键单击右侧边栏中的app.UIFigure的回调,选择添加StartupFcn回调 来给上面的汇率变量x赋初值。在StartupFcn的回调函数下添加如下代码完成对x的赋值:
1
app.x=6.9;      %美元对人民币的汇率约为6.9左右
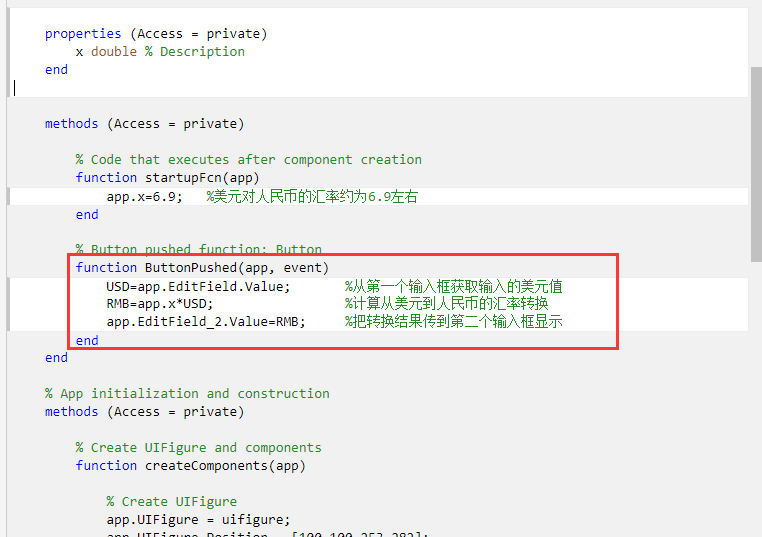
在Button的回调函数中添加如下代码:
1
2
3
USD=app.EditField.Value;       %从第一个输入框获取输入的美元值
RMB=app.x*USD;                 %计算从美元到人民币的汇率转换
app.EditField_2.Value=RMB;     %把转换结果传到第二个输入框显示
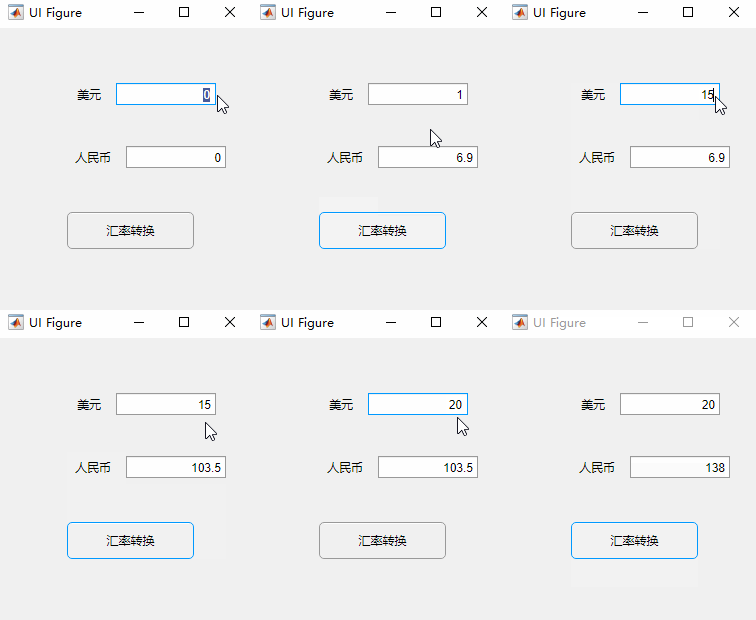
回调函数编写完成之后,点击导航栏中的运行,运行这个app,效果如下图中的动图所示:
这个app的完整代码如下所示:
1
2
3
4
5
6
7
8
9
10
11
12
13
14
15
16
17
18
19
20
21
22
23
24
25
26
27
28
29
30
31
32
33
34
35
36
37
38
39
40
41
42
43
44
45
46
47
48
49
50
51
52
53
54
55
56
57
58
59
60
61
62
63
64
65
66
67
68
69
70
71
72
73
74
75
76
77
78
79
80
81
82
83
84
85
86
87
88
89
90
91
92
93
94
95
96
97
98
99
classdef app1 < matlab.apps.AppBase

    % Properties that correspond to app components
    properties (Access = public)
        UIFigure          matlab.ui.Figure
        EditFieldLabel    matlab.ui.control.Label
        EditField         matlab.ui.control.NumericEditField
        EditField_2Label  matlab.ui.control.Label
        EditField_2       matlab.ui.control.NumericEditField
        Button            matlab.ui.control.Button
    end


    properties (Access = private)
        x double % Description
    end


    methods (Access = private)

        % Code that executes after component creation
        function startupFcn(app)
            app.x=6.9;   %美元对人民币的汇率约为6.9左右
        end

        % Button pushed function: Button
        function ButtonPushed(app, event)
            USD=app.EditField.Value;       %从第一个输入框获取输入的美元值
            RMB=app.x*USD;                 %计算从美元到人民币的汇率转换
            app.EditField_2.Value=RMB;     %把转换结果传到第二个输入框显示
        end
    end

    % App initialization and construction
    methods (Access = private)

        % Create UIFigure and components
        function createComponents(app)

            % Create UIFigure
            app.UIFigure = uifigure;
            app.UIFigure.Position = [100 100 253 282];
            app.UIFigure.Name = 'UI Figure';

            % Create EditFieldLabel
            app.EditFieldLabel = uilabel(app.UIFigure);
            app.EditFieldLabel.HorizontalAlignment = 'right';
            app.EditFieldLabel.Position = [73 206 29 22];
            app.EditFieldLabel.Text = '美元';

            % Create EditField
            app.EditField = uieditfield(app.UIFigure, 'numeric');
            app.EditField.Position = [117 206 100 22];

            % Create EditField_2Label
            app.EditField_2Label = uilabel(app.UIFigure);
            app.EditField_2Label.HorizontalAlignment = 'right';
            app.EditField_2Label.Position = [71 143 41 22];
            app.EditField_2Label.Text = '人民币';

            % Create EditField_2
            app.EditField_2 = uieditfield(app.UIFigure, 'numeric');
            app.EditField_2.Position = [127 143 100 22];

            % Create Button
            app.Button = uibutton(app.UIFigure, 'push');
            app.Button.ButtonPushedFcn = createCallbackFcn(app, @ButtonPushed, true);
            app.Button.Position = [68 62 127 37];
            app.Button.Text = '汇率转换';
        end
    end

    methods (Access = public)

        % Construct app
        function app = app1

            % Create and configure components
            createComponents(app)

            % Register the app with App Designer
            registerApp(app, app.UIFigure)

            % Execute the startup function
            runStartupFcn(app, @startupFcn)

            if nargout == 0
                clear app
            end
        end

        % Code that executes before app deletion
        function delete(app)

            % Delete UIFigure when app is deleted
            delete(app.UIFigure)
        end
    end
end
4、其他控件的使用
4.1 图表(坐标区)控件的使用
我们经常见到在app中显示图表的问题,这里以绘制y=sin(x) 和 y=cos(x)的图像为例讲一下如何使用图表控件显示图。首先我们需要把坐标区控件拖拽到画布中合适的位置,再拖拽两个按钮(分别绘制y=sin(x) 和 y=cos(x)的图像)。
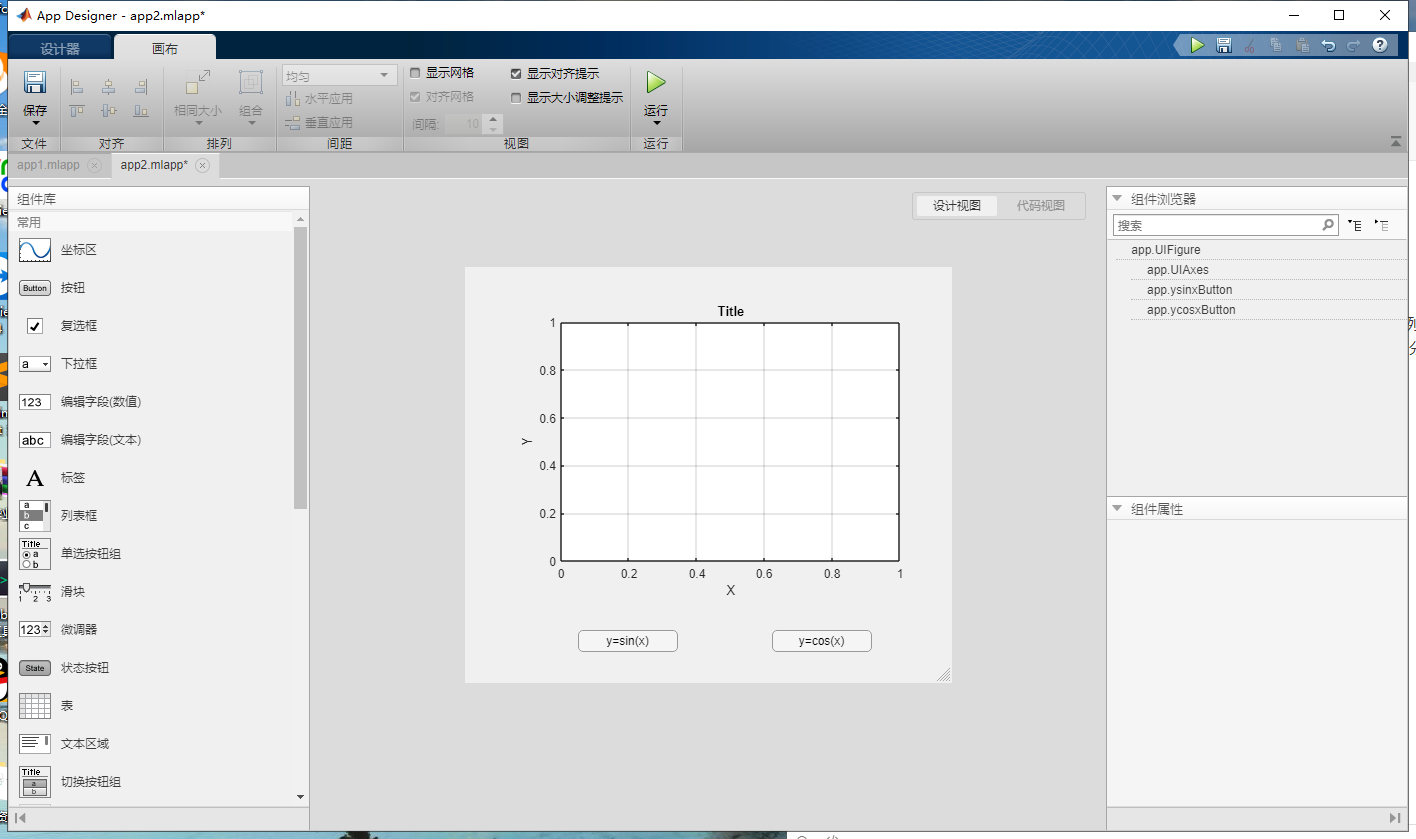
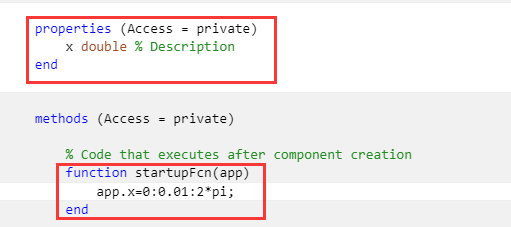
和3.4中一样添加一个私有属性来定义一个变量x,并再引入回调函数StartupFcn来给x赋初值,如下所示:
下一步分别设置两个按钮的回调函数,在其中分别添加如下代码:
1
2
3
4
5
6
7
8
9
% Button pushed function: ysinxButton
function ysinxButtonPushed(app, event)
	plot(app.UIAxes,app.x,sin(app.x));
end

% Button pushed function: ycosxButton
function ycosxButtonPushed(app, event)
	plot(app.UIAxes,app.x,cos(app.x));
end
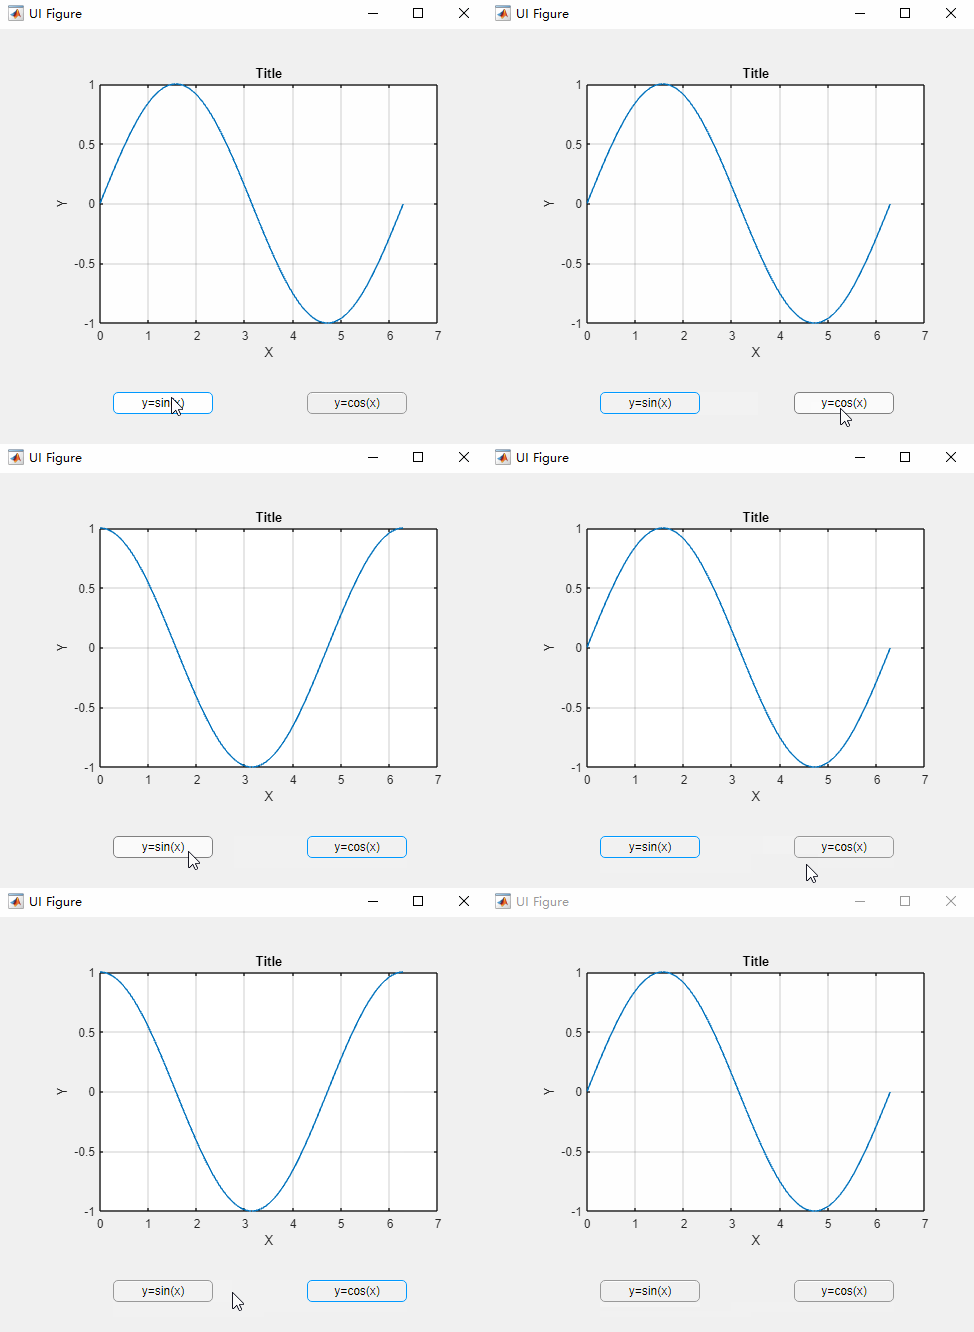
不知道注意到了没有,要在坐标区控件中显示图的话,需要在plot()中添加app.UIAxes 这个语句。最后的效果如下面动图所示:
完整代码如下所示:
1
2
3
4
5
6
7
8
9
10
11
12
13
14
15
16
17
18
19
20
21
22
23
24
25
26
27
28
29
30
31
32
33
34
35
36
37
38
39
40
41
42
43
44
45
46
47
48
49
50
51
52
53
54
55
56
57
58
59
60
61
62
63
64
65
66
67
68
69
70
71
72
73
74
75
76
77
78
79
80
81
82
83
84
85
86
87
88
89
90
91
92
93
94
95
96
97
classdef app2 < matlab.apps.AppBase

    % Properties that correspond to app components
    properties (Access = public)
        UIFigure     matlab.ui.Figure
        UIAxes       matlab.ui.control.UIAxes
        ysinxButton  matlab.ui.control.Button
        ycosxButton  matlab.ui.control.Button
    end


    properties (Access = private)
        x double % Description
    end


    methods (Access = private)

        % Code that executes after component creation
        function startupFcn(app)
            app.x=0:0.01:2*pi;
        end

        % Button pushed function: ysinxButton
        function ysinxButtonPushed(app, event)
            plot(app.UIAxes,app.x,sin(app.x));
        end

        % Button pushed function: ycosxButton
        function ycosxButtonPushed(app, event)
            plot(app.UIAxes,app.x,cos(app.x));
        end
    end

    % App initialization and construction
    methods (Access = private)

        % Create UIFigure and components
        function createComponents(app)

            % Create UIFigure
            app.UIFigure = uifigure;
            app.UIFigure.Position = [100 100 487 416];
            app.UIFigure.Name = 'UI Figure';

            % Create UIAxes
            app.UIAxes = uiaxes(app.UIFigure);
            title(app.UIAxes, 'Title')
            xlabel(app.UIAxes, 'X')
            ylabel(app.UIAxes, 'Y')
            app.UIAxes.Box = 'on';
            app.UIAxes.XGrid = 'on';
            app.UIAxes.YGrid = 'on';
            app.UIAxes.TitleFontWeight = 'bold';
            app.UIAxes.Position = [55 86 389 296];

            % Create ysinxButton
            app.ysinxButton = uibutton(app.UIFigure, 'push');
            app.ysinxButton.ButtonPushedFcn = createCallbackFcn(app, @ysinxButtonPushed, true);
            app.ysinxButton.Position = [114 32 100 22];
            app.ysinxButton.Text = 'y=sin(x)';

            % Create ycosxButton
            app.ycosxButton = uibutton(app.UIFigure, 'push');
            app.ycosxButton.ButtonPushedFcn = createCallbackFcn(app, @ycosxButtonPushed, true);
            app.ycosxButton.Position = [308 32 100 22];
            app.ycosxButton.Text = 'y=cos(x)';
        end
    end

    methods (Access = public)

        % Construct app
        function app = app2

            % Create and configure components
            createComponents(app)

            % Register the app with App Designer
            registerApp(app, app.UIFigure)

            % Execute the startup function
            runStartupFcn(app, @startupFcn)

            if nargout == 0
                clear app
            end
        end

        % Code that executes before app deletion
        function delete(app)

            % Delete UIFigure when app is deleted
            delete(app.UIFigure)
        end
    end
end
4.2 拨码开关和信号灯的使用
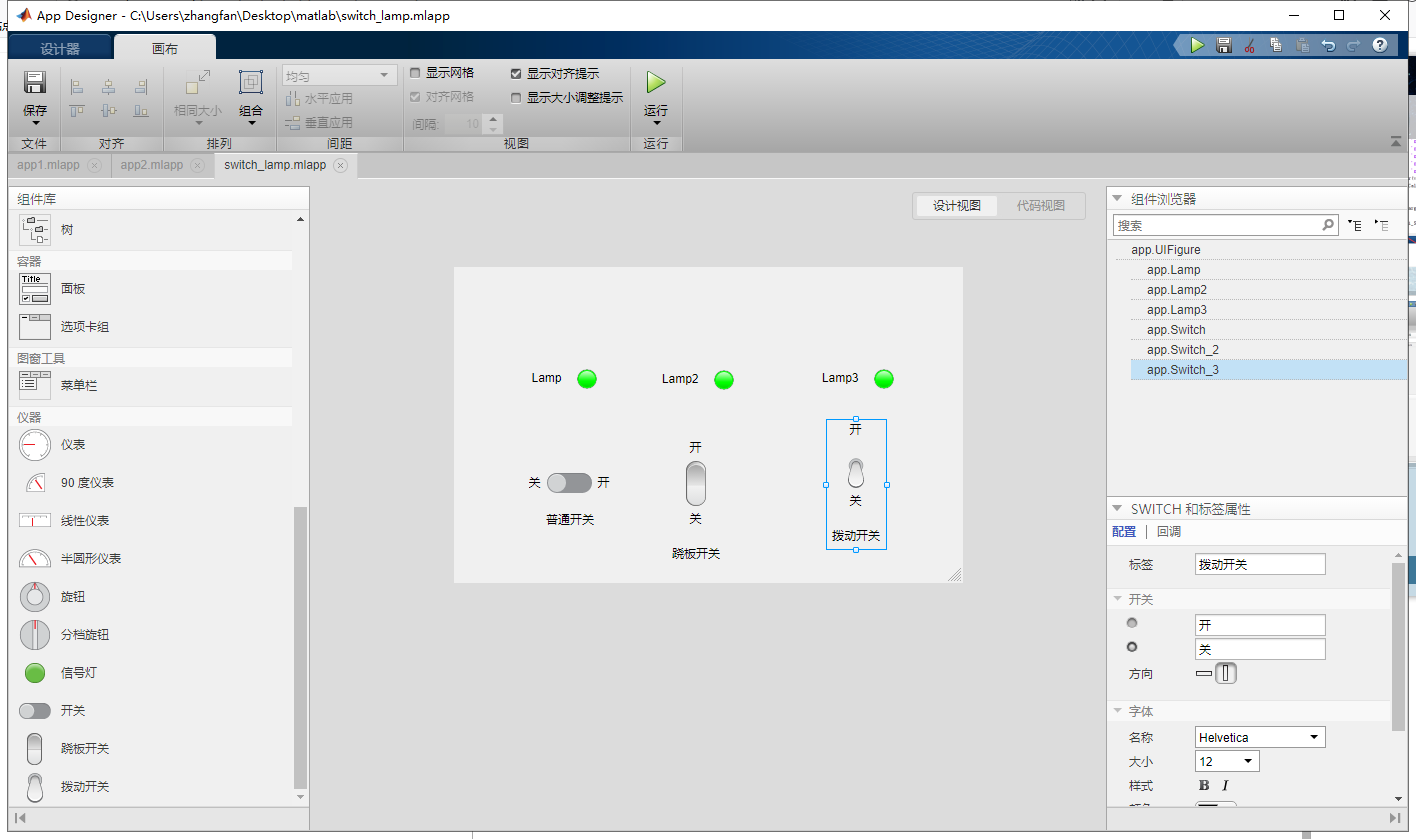
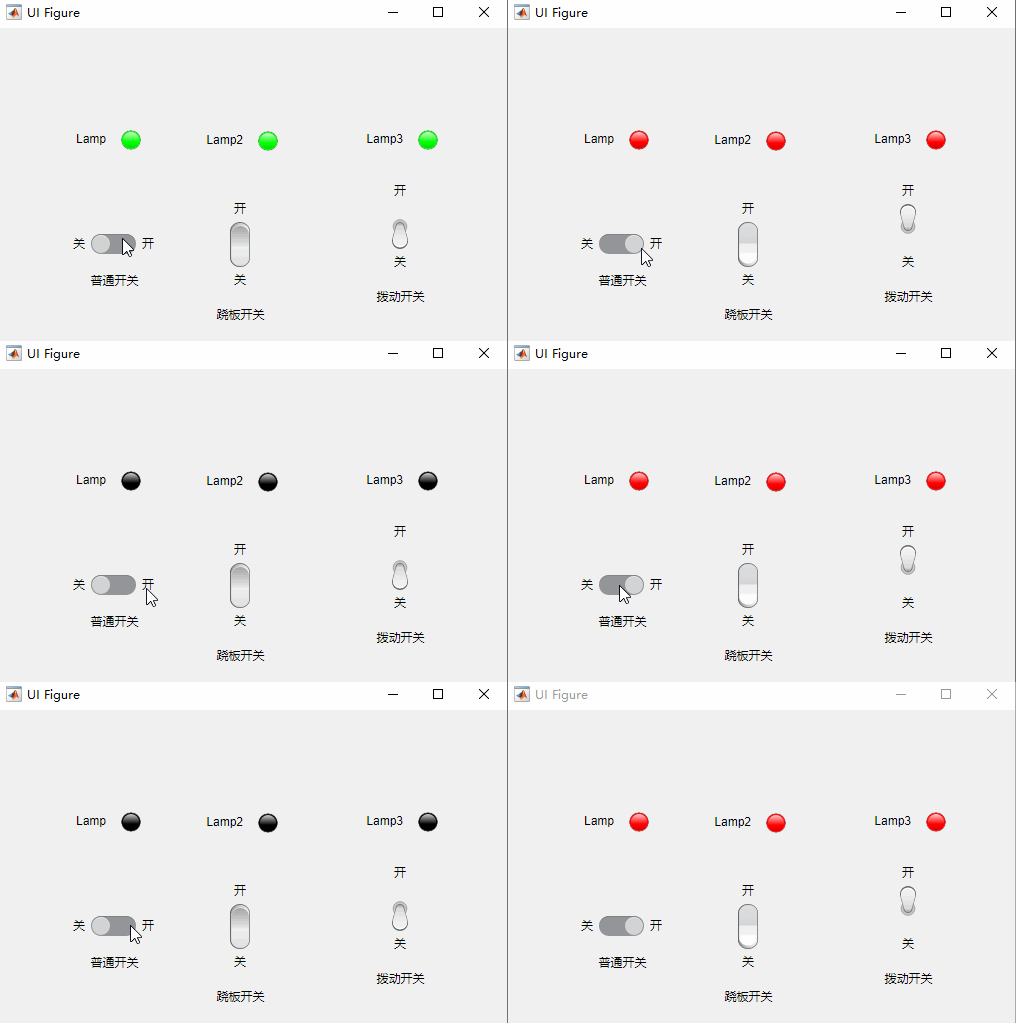
以拨码开关控制信号灯为例来说说拨码开关和信号灯控件的使用。这里设置三个控制项,分别对应普通开关、跷板开关、拨码开关。
如下图所示,将开关和信号灯拖拽到合适的位置,并修改控件相应的文本,以方便使用。
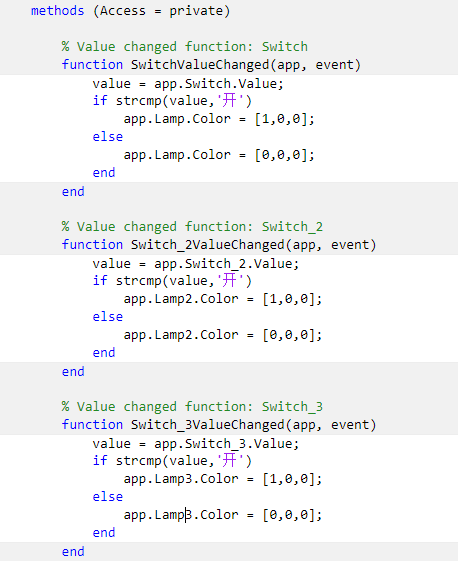
下一步添加三个开关的回调函数,以实现控制相关信号灯的功能,回调函数如下图所示,需要注意的是,由于把信号灯亮时的信号值改为了“开”,所以在程序中要用“开”代替“On”。信号灯显示的颜色由app.Lamp.Color=[red,green,blue]来确定,其中red、green、 blue为红绿蓝的值,其值介于0-1之间。
下面动图为该app的显示效果:
完整代码如下所示:
1
2
3
4
5
6
7
8
9
10
11
12
13
14
15
16
17
18
19
20
21
22
23
24
25
26
27
28
29
30
31
32
33
34
35
36
37
38
39
40
41
42
43
44
45
46
47
48
49
50
51
52
53
54
55
56
57
58
59
60
61
62
63
64
65
66
67
68
69
70
71
72
73
74
75
76
77
78
79
80
81
82
83
84
85
86
87
88
89
90
91
92
93
94
95
96
97
98
99
100
101
102
103
104
105
106
107
108
109
110
111
112
113
114
115
116
117
118
119
120
121
122
123
124
125
126
127
128
129
130
131
132
133
134
135
136
137
138
139
140
141
142
143
144
145
146
147
148
149
150
151
152
153
154
155
156
157
158
classdef switch_lamp < matlab.apps.AppBase

    % Properties that correspond to app components
    properties (Access = public)
        UIFigure       matlab.ui.Figure
        LampLabel      matlab.ui.control.Label
        Lamp           matlab.ui.control.Lamp
        Lamp2Label     matlab.ui.control.Label
        Lamp2          matlab.ui.control.Lamp
        Lamp3Label     matlab.ui.control.Label
        Lamp3          matlab.ui.control.Lamp
        Label          matlab.ui.control.Label
        Switch         matlab.ui.control.Switch
        Switch_2Label  matlab.ui.control.Label
        Switch_2       matlab.ui.control.RockerSwitch
        Switch_3Label  matlab.ui.control.Label
        Switch_3       matlab.ui.control.ToggleSwitch
    end

    methods (Access = private)

        % Value changed function: Switch
        function SwitchValueChanged(app, event)
            value = app.Switch.Value;
            if strcmp(value,'开')
                app.Lamp.Color = [1,0,0];
            else
                app.Lamp.Color = [0,0,0];
            end
        end

        % Value changed function: Switch_2
        function Switch_2ValueChanged(app, event)
            value = app.Switch_2.Value;
            if strcmp(value,'开')
                app.Lamp2.Color = [1,0,0];
            else
                app.Lamp2.Color = [0,0,0];
            end
        end

        % Value changed function: Switch_3
        function Switch_3ValueChanged(app, event)
            value = app.Switch_3.Value;
            if strcmp(value,'开')
                app.Lamp3.Color = [1,0,0];
            else
                app.Lamp3.Color = [0,0,0];
            end
        end
    end

    % App initialization and construction
    methods (Access = private)

        % Create UIFigure and components
        function createComponents(app)

            % Create UIFigure
            app.UIFigure = uifigure;
            app.UIFigure.Position = [100 100 509 316];
            app.UIFigure.Name = 'UI Figure';

            % Create LampLabel
            app.LampLabel = uilabel(app.UIFigure);
            app.LampLabel.HorizontalAlignment = 'right';
            app.LampLabel.Position = [73 195 36 22];
            app.LampLabel.Text = 'Lamp';

            % Create Lamp
            app.Lamp = uilamp(app.UIFigure);
            app.Lamp.Position = [124 195 20 20];

            % Create Lamp2Label
            app.Lamp2Label = uilabel(app.UIFigure);
            app.Lamp2Label.HorizontalAlignment = 'right';
            app.Lamp2Label.Position = [204 194 42 22];
            app.Lamp2Label.Text = 'Lamp2';

            % Create Lamp2
            app.Lamp2 = uilamp(app.UIFigure);
            app.Lamp2.Position = [261 194 20 20];

            % Create Lamp3Label
            app.Lamp3Label = uilabel(app.UIFigure);
            app.Lamp3Label.HorizontalAlignment = 'right';
            app.Lamp3Label.Position = [364 195 42 22];
            app.Lamp3Label.Text = 'Lamp3';

            % Create Lamp3
            app.Lamp3 = uilamp(app.UIFigure);
            app.Lamp3.Position = [421 195 20 20];

            % Create Label
            app.Label = uilabel(app.UIFigure);
            app.Label.HorizontalAlignment = 'center';
            app.Label.Position = [91 54 53 22];
            app.Label.Text = '普通开关';

            % Create Switch
            app.Switch = uiswitch(app.UIFigure, 'slider');
            app.Switch.Items = {'关', '开'};
            app.Switch.ValueChangedFcn = createCallbackFcn(app, @SwitchValueChanged, true);
            app.Switch.Position = [94 91 45 20];
            app.Switch.Value = '关';

            % Create Switch_2Label
            app.Switch_2Label = uilabel(app.UIFigure);
            app.Switch_2Label.HorizontalAlignment = 'center';
            app.Switch_2Label.Position = [217 20 53 22];
            app.Switch_2Label.Text = '跷板开关';

            % Create Switch_2
            app.Switch_2 = uiswitch(app.UIFigure, 'rocker');
            app.Switch_2.Items = {'关', '开'};
            app.Switch_2.ValueChangedFcn = createCallbackFcn(app, @Switch_2ValueChanged, true);
            app.Switch_2.Position = [233 78 20 45];
            app.Switch_2.Value = '关';

            % Create Switch_3Label
            app.Switch_3Label = uilabel(app.UIFigure);
            app.Switch_3Label.HorizontalAlignment = 'center';
            app.Switch_3Label.Position = [377 38 53 22];
            app.Switch_3Label.Text = '拨动开关';

            % Create Switch_3
            app.Switch_3 = uiswitch(app.UIFigure, 'toggle');
            app.Switch_3.Items = {'关', '开'};
            app.Switch_3.ValueChangedFcn = createCallbackFcn(app, @Switch_3ValueChanged, true);
            app.Switch_3.Position = [393 96 20 45];
            app.Switch_3.Value = '关';
        end
    end

    methods (Access = public)

        % Construct app
        function app = switch_lamp

            % Create and configure components
            createComponents(app)

            % Register the app with App Designer
            registerApp(app, app.UIFigure)

            if nargout == 0
                clear app
            end
        end

        % Code that executes before app deletion
        function delete(app)

            % Delete UIFigure when app is deleted
            delete(app.UIFigure)
        end
    end
end
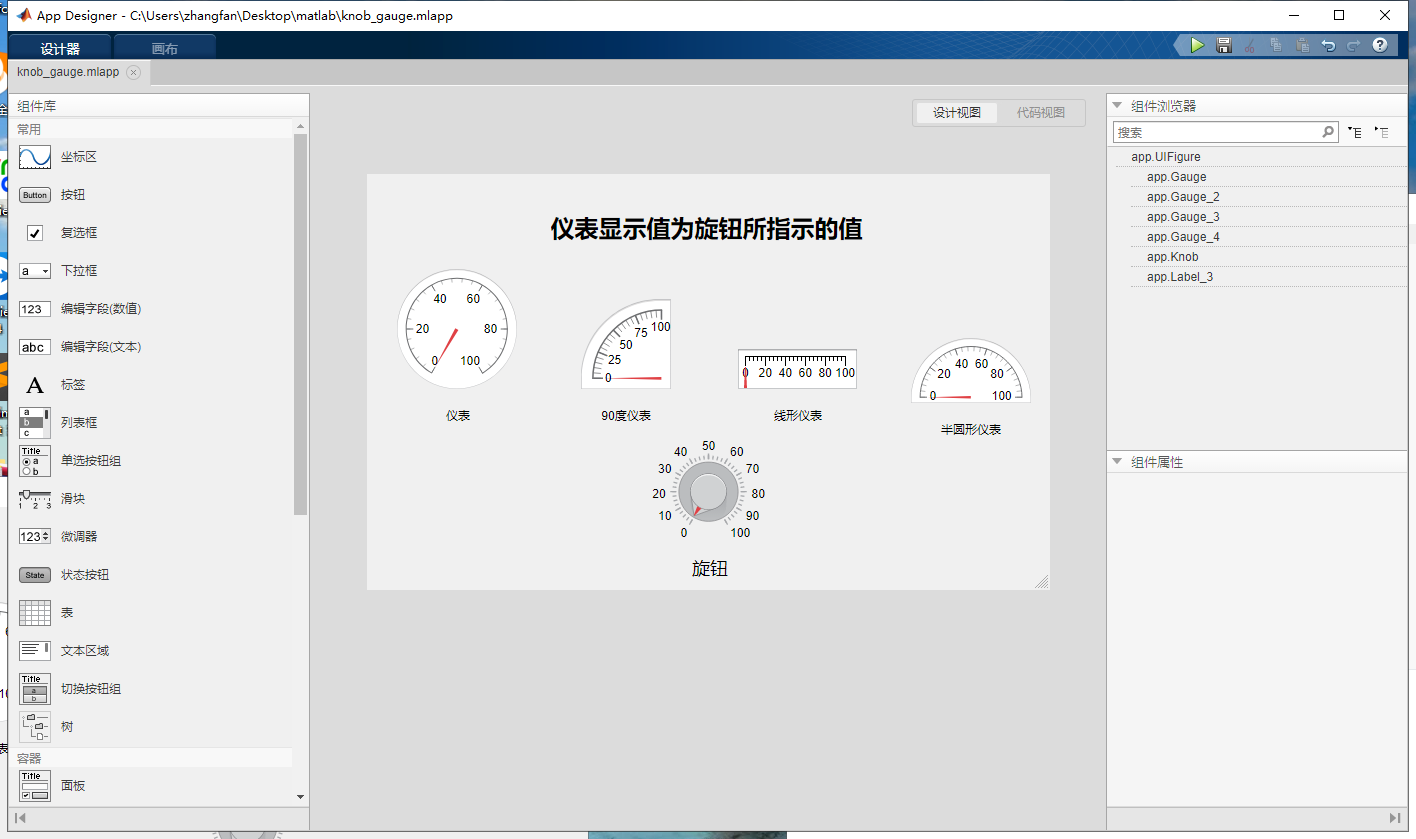
4.3 旋钮及仪表控件的使用
以旋钮控制仪表的显示值为例来讲解旋钮及仪表控件的使用,把旋钮和仪表拖拽到画布中合适的位置,并更改控件的一些属性值以方便使用。
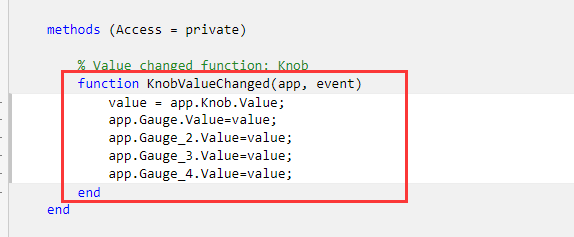
下一步就是编辑旋钮的回调函数了,右键单击旋钮的图标,选择添加回调函数,在回调函数中添加如下的代码,其中value是目前旋钮所指示的值,通过app.Gauge.Value=value来将旋钮的指示值赋给仪表来显示。
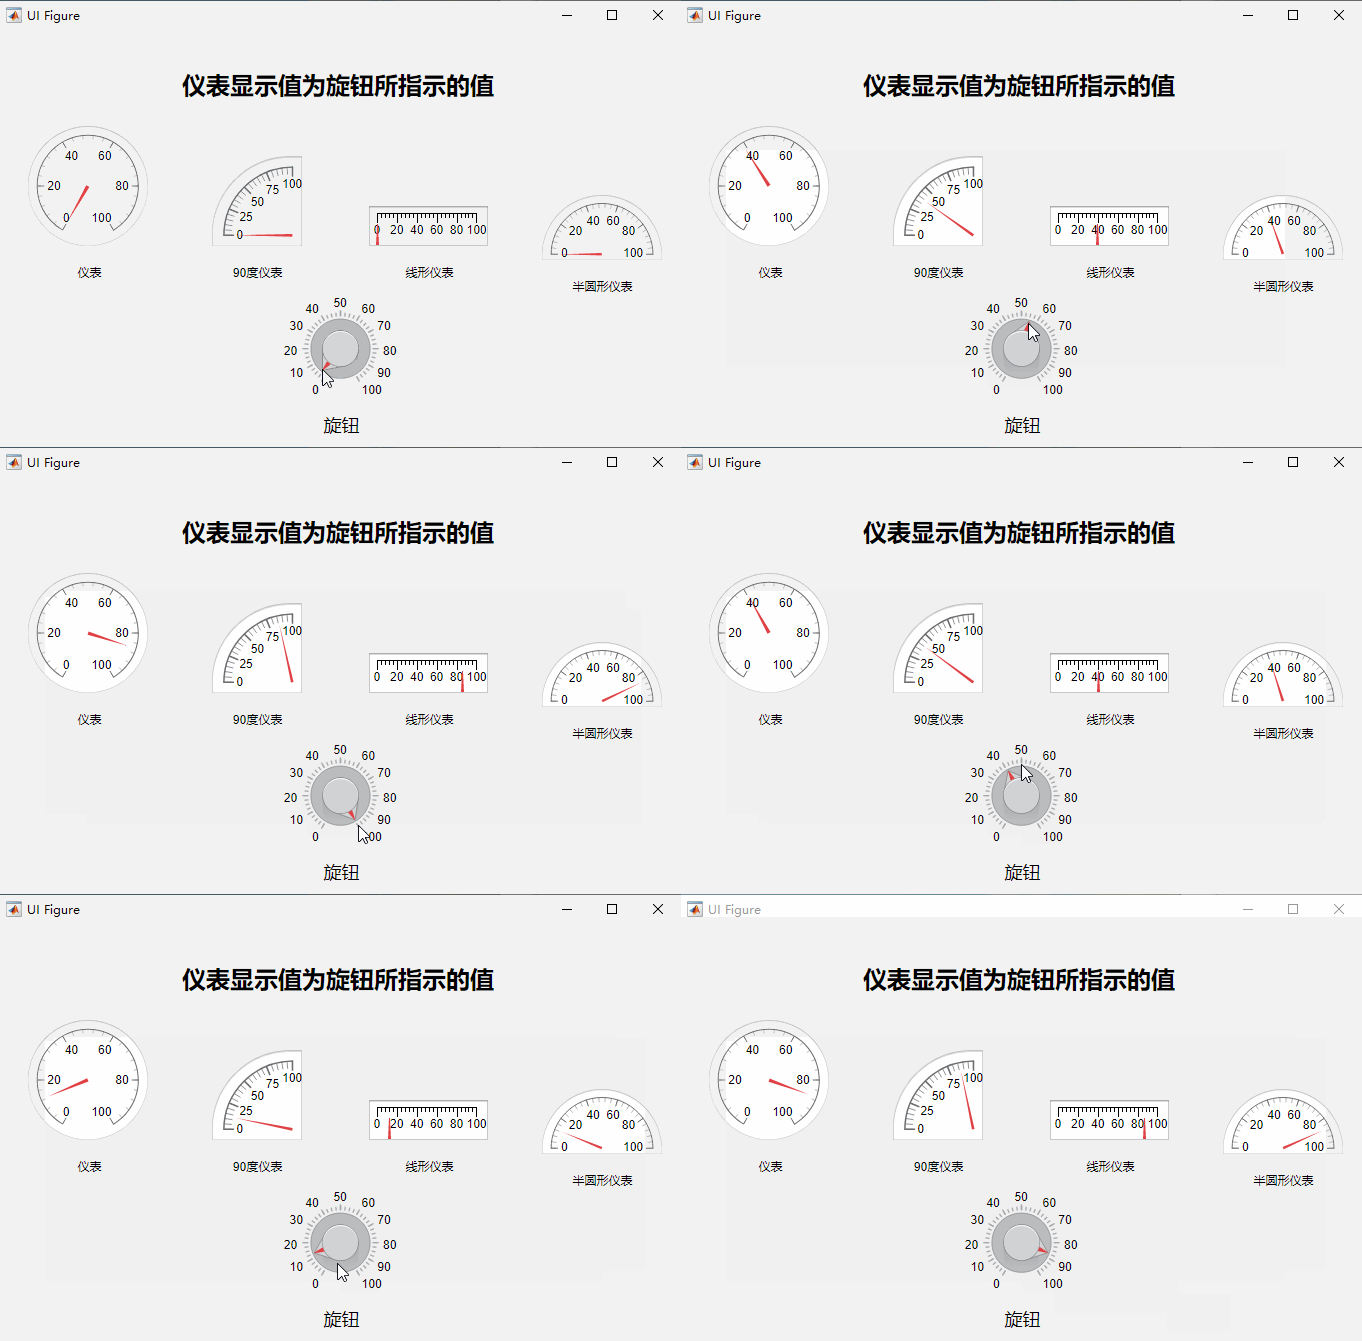
完整代码如下所示:
1
2
3
4
5
6
7
8
9
10
11
12
13
14
15
16
17
18
19
20
21
22
23
24
25
26
27
28
29
30
31
32
33
34
35
36
37
38
39
40
41
42
43
44
45
46
47
48
49
50
51
52
53
54
55
56
57
58
59
60
61
62
63
64
65
66
67
68
69
70
71
72
73
74
75
76
77
78
79
80
81
82
83
84
85
86
87
88
89
90
91
92
93
94
95
96
97
98
99
100
101
102
103
104
105
106
107
108
109
110
111
112
113
114
115
116
117
118
119
120
121
122
123
124
125
126
classdef knob_gauge < matlab.apps.AppBase

    % Properties that correspond to app components
    properties (Access = public)
        UIFigure      matlab.ui.Figure
        Label         matlab.ui.control.Label
        Gauge         matlab.ui.control.Gauge
        Gauge_2Label  matlab.ui.control.Label
        Gauge_2       matlab.ui.control.NinetyDegreeGauge
        Gauge_3Label  matlab.ui.control.Label
        Gauge_3       matlab.ui.control.LinearGauge
        Gauge_4Label  matlab.ui.control.Label
        Gauge_4       matlab.ui.control.SemicircularGauge
        Label_2       matlab.ui.control.Label
        Knob          matlab.ui.control.Knob
        Label_3       matlab.ui.control.Label
    end

    methods (Access = private)

        % Value changed function: Knob
        function KnobValueChanged(app, event)
            value = app.Knob.Value;
            app.Gauge.Value=value;
            app.Gauge_2.Value=value;
            app.Gauge_3.Value=value;
            app.Gauge_4.Value=value;
        end
    end

    % App initialization and construction
    methods (Access = private)

        % Create UIFigure and components
        function createComponents(app)

            % Create UIFigure
            app.UIFigure = uifigure;
            app.UIFigure.Position = [100 100 683 416];
            app.UIFigure.Name = 'UI Figure';

            % Create Label
            app.Label = uilabel(app.UIFigure);
            app.Label.HorizontalAlignment = 'center';
            app.Label.Position = [78 165 29 22];
            app.Label.Text = '仪表';

            % Create Gauge
            app.Gauge = uigauge(app.UIFigure, 'circular');
            app.Gauge.Position = [31 202 120 120];

            % Create Gauge_2Label
            app.Gauge_2Label = uilabel(app.UIFigure);
            app.Gauge_2Label.HorizontalAlignment = 'center';
            app.Gauge_2Label.Position = [233 165 55 22];
            app.Gauge_2Label.Text = '90度仪表';

            % Create Gauge_2
            app.Gauge_2 = uigauge(app.UIFigure, 'ninetydegree');
            app.Gauge_2.Position = [215 202 90 90];

            % Create Gauge_3Label
            app.Gauge_3Label = uilabel(app.UIFigure);
            app.Gauge_3Label.HorizontalAlignment = 'center';
            app.Gauge_3Label.Position = [406 165 53 22];
            app.Gauge_3Label.Text = '线形仪表';

            % Create Gauge_3
            app.Gauge_3 = uigauge(app.UIFigure, 'linear');
            app.Gauge_3.Position = [372 202 119 40];

            % Create Gauge_4Label
            app.Gauge_4Label = uilabel(app.UIFigure);
            app.Gauge_4Label.HorizontalAlignment = 'center';
            app.Gauge_4Label.Position = [573 151 65 22];
            app.Gauge_4Label.Text = '半圆形仪表';

            % Create Gauge_4
            app.Gauge_4 = uigauge(app.UIFigure, 'semicircular');
            app.Gauge_4.Position = [545 188 120 65];

            % Create Label_2
            app.Label_2 = uilabel(app.UIFigure);
            app.Label_2.HorizontalAlignment = 'center';
            app.Label_2.FontSize = 18;
            app.Label_2.Position = [324 11 41 24];
            app.Label_2.Text = '旋钮';

            % Create Knob
            app.Knob = uiknob(app.UIFigure, 'continuous');
            app.Knob.ValueChangedFcn = createCallbackFcn(app, @KnobValueChanged, true);
            app.Knob.Position = [313 69 60 60];

            % Create Label_3
            app.Label_3 = uilabel(app.UIFigure);
            app.Label_3.FontSize = 24;
            app.Label_3.FontWeight = 'bold';
            app.Label_3.Position = [185 348 321 31];
            app.Label_3.Text = '仪表显示值为旋钮所指示的值';
        end
    end

    methods (Access = public)

        % Construct app
        function app = knob_gauge

            % Create and configure components
            createComponents(app)

            % Register the app with App Designer
            registerApp(app, app.UIFigure)

            if nargout == 0
                clear app
            end
        end

        % Code that executes before app deletion
        function delete(app)

            % Delete UIFigure when app is deleted
            delete(app.UIFigure)
        end
    end
end